If you’ve ever wondered how to transplant your beloved plants without inflicting harm on their delicate roots, you’re not alone. This process can seem daunting, especially given the crucial role that roots play in a plant’s health. They act as lifelines, drawing up water and nutrients from the soil, and any damage can significantly impact a plant’s ability to thrive.
In this article, we’ll explore:
- The essential steps for preparing your plant and the new location ahead of the process, ensuring both are ready for a smooth transition.
- Techniques for carefully removing the plant from its current pot or ground without causing harm to its root system, highlighting the importance of minimizing stress on the plant.
- Best practices for post-transplant care, focusing on soil, watering, and environmental considerations that will help your plant adjust and flourish in its new home.
Why is Transplanting Necessary?
There are various reasons why one might need to transplant their plants. It could be because they’ve outgrown their current pot or location, or you want to transfer them to your garden for better growth. Whatever the reason may be, it is essential for the overall health and vitality of your plants.
When plants are confined to containers or small spaces, their roots can become root-bound, meaning they start growing in circles and eventually become cramped. This restricts their ability to absorb nutrients and water from the soil, leading to stunted growth and other issues. By this process, you provide your plants with fresh soil and ample space for their roots to spread, promoting healthy growth.
Preparing for Transplantation
Before even thinking about digging up your plant, it’s essential to understand why you’re doing it and what factors to consider. Common reasons include wanting to give a plant more room to grow, correcting any root-bound issues, or simply giving the plant a fresh start in new soil. Once you have identified your reason, you can move on to the following steps:
Choosing a Suitable Location
As they say, location is everything. When selecting where to transplant your plants, consider the amount of sunlight, soil type and drainage, and space availability for growth. Different plants have varying light requirements, so ensure you choose a spot that receives adequate sun exposure for your specific species. Additionally, if you’re planting in the ground, make sure the soil is well-draining to prevent waterlogging, which can cause root rot.
Preparing the New Location
Once you’ve selected a suitable location, it’s time to prepare the new spot for your plant. If transplanting to a container, ensure it is clean and has adequate drainage holes. For planting in the ground, you can dig a hole twice as wide and deep as the plant’s root ball to loosen the soil and encourage proper root growth.
The Process
With your preparations complete, it’s time to move on to the crucial process without damaging roots. Follow these steps for a seamless transition:
Watering the Plant
It is vital to water your plant thoroughly before the process. Moist soil makes it easier to remove the plant from its current pot or ground location without damaging the roots.
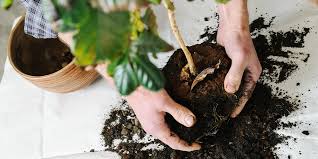
Gently Loosen the Roots
Carefully remove the plant from its pot or dig it out of the ground using a garden shovel. Once removed, gently loosen any tightly packed roots around the root ball, being careful not to tear or break them.
Inspecting the Roots
Before moving to the new location, inspect the roots for any signs of damage or disease. If you notice any unhealthy or damaged roots, trim them off with clean pruning shears.
Placing the Plant in its New Home
Place the plant in the prepared hole, ensuring that it sits at the same depth as it was in its previous location. If planting in a container, fill the pot with fresh soil and gently pat it down around the plant’s root ball.
Watering Again
Once your plant is secure in its new home, give it a good watering to help settle the soil and eliminate any air pockets that may have formed during the process.
Aftercare Tips for Plants
The first few weeks are crucial for your plant’s survival, so it’s essential to provide proper care during this time. Here are a few tips to help your plants adjust:
- Water regularly: Plants will need more frequent watering until they establish their root systems in the new location.
- Avoid fertilizing right away: Fertilizers can burn new roots, so it’s best to wait a few weeks before applying any nutrients.
- Monitor for signs of shock: Some plants may experience shock, causing wilting or drooping leaves. Keep an eye on your plant and provide extra care and attention if needed.
Common Problems and Solutions
Despite our best efforts, it can sometimes lead to a few hiccups along the way. Here are some common problems you might encounter and their respective solutions:
Problem: Wilting or Yellowing of Leaves
This is a common sign of shock, a condition where the plant struggles to adjust to its new environment.
Solution: Ensure your plant is getting adequate water, but be careful not to overwater. Keep it in a sheltered location away from harsh sunlight or winds for the first few days. If the problem persists, consider defoliation. This technique involves removing some of the leaves to reduce stress on the plant and allow it to focus on establishing its root system. However, it’s essential to approach defoliation with caution: removing too many leaves can hinder photosynthesis, the process by which plants convert sunlight into energy. Therefore, only defoliate when necessary, and always ensure to leave enough leaves to enable the plant to continue growing healthily in its new location.
Problem: Root Rot
This problem often occurs due to overwatering or poor soil drainage.
Solution: Make sure your plant’s new location has good water drainage. If you’re dealing with a potted plant, ensure the container has adequate drainage holes. Consider mixing some perlite or sand into the soil to improve its drainage capability.
Problem: Stunted Growth
This can be a sign that your plant is not getting enough nutrients from the soil.
Solution: After the first few weeks, start adding a mild, slow-release fertilizer to your watering routine. This will gradually introduce nutrients into the soil without overwhelming the plant.
Problem: Pest Infestation
The process can stress a plant, making it more susceptible to pests.
Solution: Keep a close eye on your plants. If you notice any pests, treat them immediately with a natural or chemical pesticide suitable for your plant type.
Conclusion
Transplanting a plant is a delicate process that requires careful planning and execution. By following the steps outlined in this guide, you can ensure your plant’s smooth transition to its new home while minimizing root damage. Remember, the key to successful transplanting is patience and attentiveness to your plant’s needs.