Regular roof inspections play a critical role in maintaining the integrity and safety of a home. They are necessary to prevent small issues from turning into major problems. By keeping an eye on the condition of the roof, costly repairs can be avoided, and the lifespan of the roof can be extended. An added benefit of regular inspections is the peace of mind that comes with knowing the home is well-protected against the elements.
Taking a DIY approach to roof inspections offers numerous advantages. Firstly, it can lead to significant cost savings. While professional roof inspections can be insightful and the right choice in some cases, performing a DIY inspection can help homeowners familiarise themselves with their roof’s condition and spot potential issues early on. Secondly, homeowners gain a better understanding of their home’s structure, fostering a sense of self-reliance and increased awareness of the home’s needs.
This comprehensive guide aims to equip homeowners with the knowledge and tools necessary to conduct their own roof inspections. By following a practical DIY roof inspection checklist, homeowners can identify key signs of damage or wear and take proactive steps to address them. From preparing for the inspection and identifying issues with shingles and tiles, to assessing gutters, drainage systems, and attic spaces, this guide covers it all.
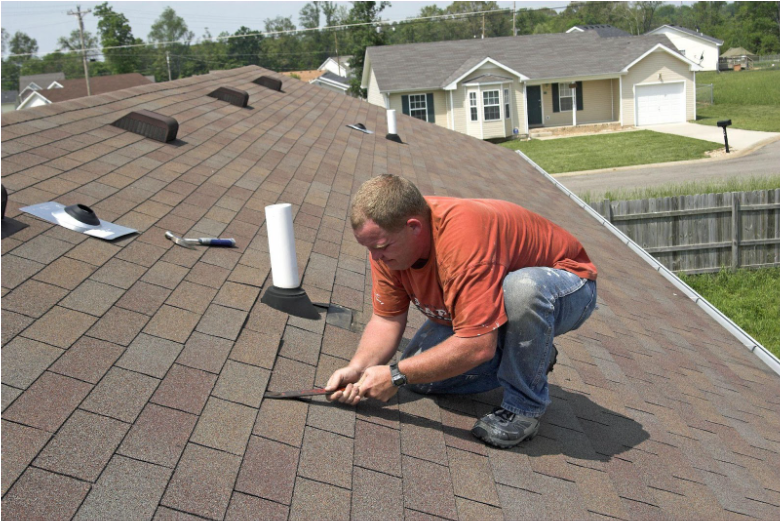
Before commencing a roof inspection, it’s crucial to consider safety precautions. Roof inspections can be dangerous without the proper care and equipment. Ensuring personal safety should always be the top priority. Wearing appropriate safety gear, using the right tools, and being cautious about weather conditions are all essential steps in conducting a successful and safe roof inspection.
Preparing for Your DIY Roof Inspection
To begin a DIY roof inspection, it’s crucial to gather the essential tools and equipment needed for a thorough examination. A durable ladder with stabilisers is the first item on the list, ensuring both safety and ease of access to the roof. A pair of binoculars can come in handy for scans from a distance, which can be especially useful for steep or intimidating roof angles. Additionally, a good flash torch, a tape measure, a notepad, and a camera to document findings are advisable.
Checking the weather conditions before embarking on a roof inspection is another vital step. Ideally, choose a day with clear skies and calm winds. Inspecting the roof during or following rain, strong winds, or during peak heat should be avoided due to hazardous conditions. Wet roofs can be slippery, while hot surfaces can cause burns or discomfort during an inspection.
Next up is selecting the proper protective gear to ensure safety during the inspection. A harness with a secure anchor point is a wise choice for those needing to survey roofs with steep slopes. Slip-resistant shoes with a good grip, gloves for handling potentially sharp objects, and helmets offer additional protection against unforeseen accidents.
Understanding the roof’s layout and structure is not only advantageous but necessary for an effective inspection. Familiarise oneself with the type of roofing material in use—be it asphalt shingles, ceramic tiles, or metal panels—as each material may exhibit wear differently. It’s beneficial to also be aware of the roof’s pitch, valleys, and the location of any skylights or vents to effectively plan out the inspection process.
Inspecting Shingles and Tiles
Shingles and tiles form the first line of defence against external elements. Noticing signs of wear and tear among these components can help mitigate further damage. Common signs include cracks, curls, and missing shingles or tiles. Cracks may appear as fine lines or outright breaks and should not be overlooked. Curled shingles often result from moisture absorption or ageing and can lead to significant water seepage.
The growth of algae and moss might appear harmless, but it can have detrimental effects on roof integrity. Algae thrive in moist environments, leaving dark stains, while moss retains moisture, further contributing to shingle deterioration. Recognising these growth patterns and taking corrective actions, such as cleaning and improvements in roof ventilation, can be preventative.
Granule loss on shingles is another aspect to watch for. Over time, granules on asphalt shingles may start to erode, leaving the underlayer exposed to the elements. If granules begin to accumulate in gutters or downpipes, it could indicate that the shingles are losing their protective coating, necessitating attention.
Deciding between minor repairs and calling for a professional’s assessment can be tricky, but crucial. If the roof appears to have a few minor issues but is otherwise in good condition, DIY repairs could suffice. However, if there are considerable worn sections, extensive granule loss, or repeated instances of algae and moss, it’s prudent to seek a professional evaluation.
Examining Roof Flashing and Seals
Flashing plays a pivotal role in preventing water leaks and safeguarding the roof against damage. Recognising the importance of flashing’s function helps in understanding its critical points during inspection. Flashing is typically installed around roof penetrations such as chimneys, vents, skylights, and areas where the roof meets vertical structures.
Inspect key areas for flashing that are prone to vulnerabilities such as corrosion, separation, or subpar installation methods. Sealing points should be closely examined to ensure they remain watertight, as these locations often face challenges from seasonal temperature fluctuations and weather impacts.
Discovering worn-out or improperly sealed flashing can help prevent future issues. Signs of wear often appear as rust spots, loose edges, or detached pieces. Catching these problems early allows for sealing replacements and appropriate repairs, keeping water intrusion at bay.
Proper seals around chimneys, vents, and skylights form a crucial line of defence against leaks. Deteriorating or cracking caulk, discolouration, or water stains are telling signs that demand immediate attention. Maintaining these seals will support the roof’s longevity and the home’s overall energy efficiency.
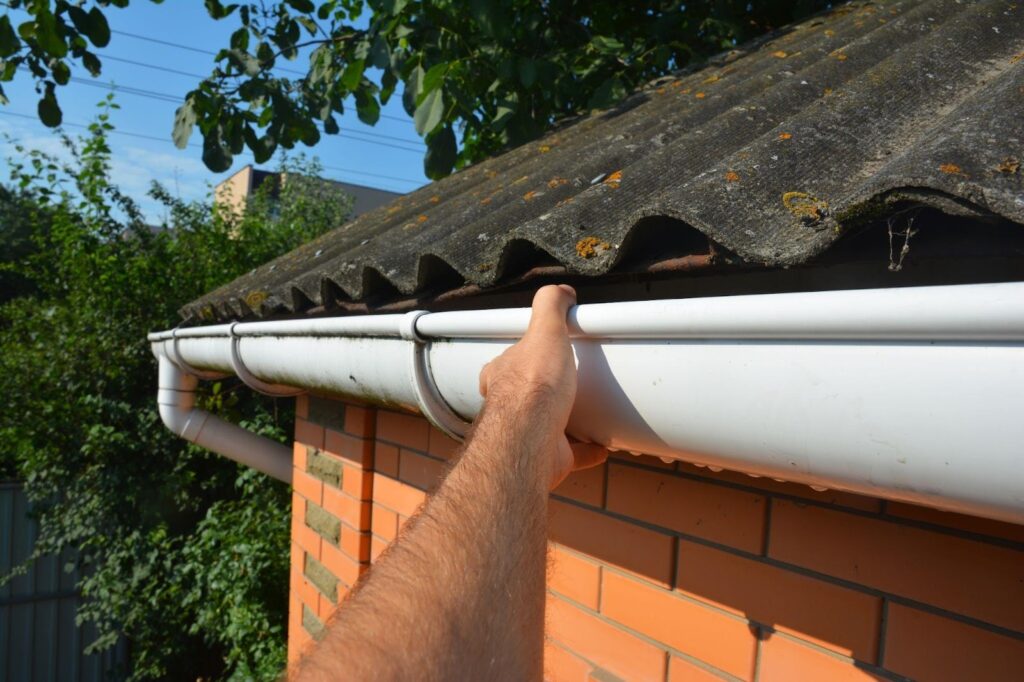
Assessing Gutters and Drainage Systems
Maintaining clean and functional gutters is essential in preserving a roof’s health. Clogged or malfunctioning gutters can lead to water accumulation, promoting decay and leaks. Regularly inspecting and cleaning the drainage system helps mitigate these risks and ensures water flows away efficiently.
Identifying issues such as clogs, sags, or rust spots is vital. Debris such as leaves or twigs might obstruct water flow, while sagging gutters could signal a failure in support brackets. Rust can develop over time, especially in metal gutters, hindering their effectiveness and leading to corrosion.
The impact of poor drainage can extend beyond mere roof concerns—it may affect the home’s foundation. Prolonged exposure to pooled water can cause erosion and structural damage. Maintaining proper drainage is thus critical for both roof health and the house’s stability.
Tips for effective gutter cleaning and maintenance include periodic checks, especially after storms or heavy foliage seasons. Using a plastic scoop for debris removal and flushing gutters with water post-cleaning ensures thoroughness. Additionally, ensuring that downspouts direct water at least 1.8 meters away from the foundation is advisable for comprehensive management.
Checking the Attic for Signs of Roof Issues
Attic inspections prove invaluable for spotting potential roof issues often hidden from an exterior view. By investigating this internal space, homeowners can discern early warnings of broader issues arising, allowing for timely intervention.
Leak signs such as stains, mould, and dampness within the attic warrant urgent attention. These can indicate breaches in the roof’s outer layers or failed vent seals. Mould growth not only threatens the structure but also poses health risks, making it vital to act swiftly if discovered.
Rot and pest infestation present further challenges within attic spaces. Indicators of rot include musty smells and wood discolouration, while signs of pests range from droppings to gnawed materials. Addressing these promptly can prevent extensive damage and ensure the attic remains a favourable storage area.
Evaluating the quality of insulation is a wise move to ensure its effectiveness in maintaining energy efficiency. Poor insulation can lead to temperature regulation struggles, increased energy bills, and an uncomfortable living environment. Regular checks and replenishing insulation gaps or compressions maintain its efficacy and contribute to the home’s comfort.
Conclusion
Undertaking a DIY roof inspection involves keen attention to various factors that indicate the roof’s condition. Key signs to watch for include evidence of shingle wear, compromised flashing, clogged gutters, and attic anomalies. Regular inspections and addressing issues promptly play a major role in protecting the roof from further damage and extending its useful life.
While DIY inspections are informative and cost-effective, recognising the point at which professional intervention is necessary is crucial. Suppose signs of widespread damage or hazards are uncovered. In that case, seeking expert advice ensures that repairs meet safety and durability standards.
Encouraging consistent inspection routines fortifies the roof against environmental challenges and unforeseen issues. By applying the knowledge gathered in this guide, homeowners actively contribute to preserving their property’s value, comfort, and security. Remember, while a DIY approach saves on costs, the importance of prioritising safety and knowing when to call in the professionals cannot be overstated.